Total Pageviews

Showing posts with label prospector. Show all posts

Thursday, August 9, 2012

Some Handy Gear for the Prospector

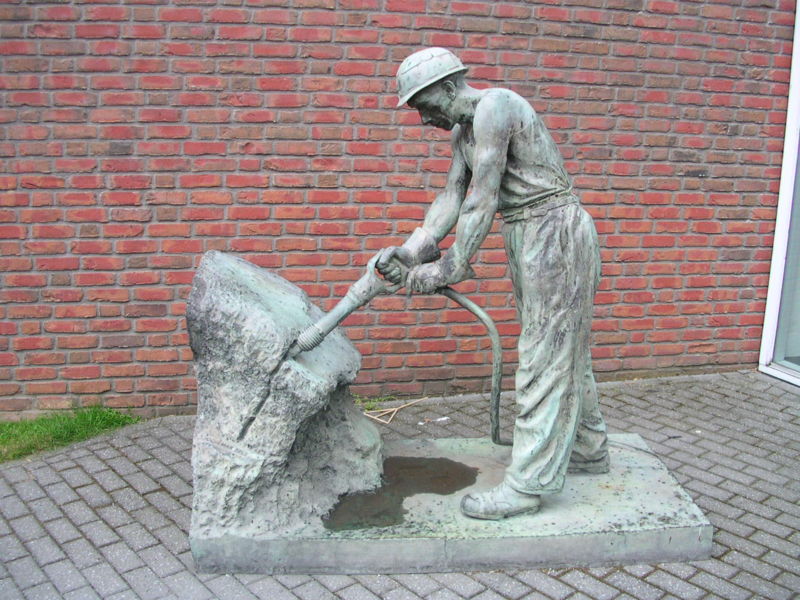
Hardrock miner
Photo by Norbert Schnitzler


There are several items that over the years we have found to be handy added to our exploration kit.  Probably one of the handiest and incidentally the heaviest is a steel anvil 3 inches in diameter by 1 inch thick.  This is used for a simple test for gold.  Gold is malleable and can be flattened with repeated blows with a hammer.  So-called fools gold is brittle breaking up into several fragments, and if reduced to powder turns black.  Gold will retain its true color everything else turns black or in the case of mica turns white.

A hat to shield your punkin head from the hot sun is one of the most valuable things you can have during a prospecting expedition.  A hat also keeps the rain off your head if it starts raining. A simple bill cap will help, but a broad brimmed hat like the cowboy’s wear is even better.  The best one is a hard hat to protect your head from falling objects.

Gloves are another thing you shouldn’t be without because after a day of shoveling or hammering you are likely to find that one of the things you’ve got is a good set of blisters among other things.  The best work gloves for the prospector are leather work gloves.

If you are hunting for gold anywhere there are snakes, and there are always plenty of snakes wherever there is gold you need a pair of snake proof boots.  A rattlesnake can strike so hard that even with snake boots you can still be bruised through your boots.  A snake bite can ruin your day.  If you are messing around in streams one of the most handiest things you can have is a pair of rubber boots, preferably hip boots.

One of the handiest things you can have on a prospecting expedition is a good jeweler’s 10X loup.  Why a 10X because it has a depth of field that is deep enough to bring things into focus.  Loupes larger then a magnification of 10x have a much shorter depth od field to render them virtually useless.  In the same vein a pad and pencil also comes in handy for making notes.  A surveyor’s pad works best because they have water-proof paper.  You could also include a ball point pen.

The really most handy things to have is a good handheld GPS unit.  You can set it at your base station so you will always be able to return.  It is also handy for finding other places where you have been.  Another use for one of these is using it for laying out claims.

Saturday, May 7, 2011

The Tools of the Trade by Raymond Kukkee, Prospector

Prospecting country in Northern Ontario this is a photo of Kakabeka Falls called the Niagara of Canada.  Ray lives in the town of  Kakabeka Falls, Ontario.
Photo by Hans Jurgen-Hubner


Raymond Kukkee has been a hard-rock prospector in Northern Ontario for over thirty years, and the following article is built on his experiences while prospecting. 

What you should take with you on a prospecting outing is always a good question. It's always better to have something and NOT need it, than to be 60 miles out on the trail wishing you did bring it along.
    
 Here's a list of what I usually take along on my day trips.  Remember I 'm going out in my truck and might be  dragging  a 4WD Quad along to save the feet too!

Even for a 2 hour walking trip, I take most of  the following tools and other helpful items,  but once out in the field  at times,  I may leave some  items  in the truck, depending on the outing:


•    A jeweler's loupe,  I use a 25x triplet
•    Topographic  and geology maps of area to be explored
•    Prospector's license*
•    Pad and pencils. Take extra pencils, they get lost easily. A compact  waterproof paper notebook is handy
•    A compass  (liquid-filled, good quality)  I use a Silva  or Brunton surveying type  c/w signaling mirror
•    A GPS unit capable of mapping,  projecting and tracking way points.    My present GPS is a Garmin GPSmap76CX, which is reliable and runs for a couple of days on 2 AA batteries.
•    Safety glasses for bashing rocks.  We only have ONE set of eyes so take care of them!
•     A compact first aid kit
•    A belt-carried hunting knife -6"   and / or a multi-tool type belt knife
•    A prospecting "pick" hammer. (In this area we have a special tool called a "Tweedie" tool named after Ron Tweedie, the inventor and maker.  It is a 36" short-handled   hammer with a 3" flat blade opposite that can be used both  for whacking rocks and grubbing, to remove moss/dirt for stripping.  (In prospecting that is convenient, it saves you bringing along a wide pick.)   At times it might be the only hammer you carry.
•    A sharp cold chisel  ½" x 12" long
•    A 4-lb short- steel- handled  "crack hammer"  unbreakable (Estwing) for serious sample removal.
•    Some paper to wrap special delicate specimens
•    Plastic sample bags 6-10  mil  8x14"  are good,  but  you can use recycled plastic bags of any type. I take along heavy recycled 1-liter plastic milk bags when available.*
•    A red or orange wax pencil for marking stakes or posts.
•    Fluorescent flagging tape to mark sample locations
•    A black marker to write ON the flagging tape
•    A short-handled ox-head axe--for cutting claim posts.   If cutting claim lines, I also  take along a
•    Swedish brush axe which is the bow design.
•    A folding shovel for the back pack, and a long-handled shovel for the truck.
•    A very compact emergency 3"x4"x 2"fishing outfit, a few hooks, line, sinkers, and a small lure.   Maybe a small collapsible fishing rod!
•    Wide-brimmed floppy hat that will cover the ears.
•    Full face mosquito net that fits over the floppy hat for extreme insect conditions.
•    Fly dope.   Various types, it must work on blackflies, mosquitoes, and deer flies.  But is generally USELESS for those tiny noseeum sandflies in hot weather
•    Extra socks to keep the feet dry.
•    Heavy boots that have high ankle protection. Waterproof boots are best
•    Rain gear--lightweight rubber but full body coverage including a hood--or the  Gortex type
•    Long-legged pants,  NOT shorts.
•    Long-sleeved shirt and jacket
•    Leather gloves, or good quality cotton gloves with leather facing
•    Eye-glasses.  I always take a spare pair!
•    Sunglasses
•    Sunscreen: 40SPF minimum.
•    A compact, folding dome tent.
•    In some areas, a snake bite kit is a good idea.
•    For SOME locations, belt-carried  Bear pepper spray is important.
•    Aspirin or Tylenol.
•    Medications if you need them.
•    Drinking WATER:  NEVER  allow yourself to become dehydrated.
•    Matches. Use safety matches, protected to keep dry, or bring along a Fire Starter (magnesium) bar.
•    Food:
•    Dry Trail mix for snacks.  
Oranges are good too, and keep well
•    Lunch!    The best part of prospecting out in the bush!  I almost always take cheese sandwiches going on day trips into remote areas.    Take food that will still be good for a week even if it's squashed, melted, or beaten up. Dehydrated type foods are good for long trips too.
•    **  NOTE:   NEVER take meat sandwiches or chicken with mayonnaise out into hot weather, they can be unsafe to eat after a few hours in summer heat!
•    Hot Coffee or Tea in a thermos for cold days.
•    A small single-burner propane stove can be handy!
 
    
I guess that’s about all you  can carry, but then there’s a spare key for the vehicle,  spare gasoline, a couple of quarts of oil, some tools, a Jack-all, a couple of spare tires, and walkie-talkies if you have them.


Don’t forget that 8-lb sledgehammer for serious work, a compact bow saw for firewood -- and your driver’s license.

I guess that’s about all you should need at this point.   I hope you’re having FUN!  If I think of anything else, I’ll let you know!     Stay safe!

Raymond  

* Needed in Canada!

Friday, April 29, 2011

Gold Occurrences in Oregon

In 1964 the author spent some time as a prospector looking for gold in southeastern Oregon on down by the Nevada border. Although we didn't see much gold we had a good look at the Oregon desert.

Map of Oregon showing the High Desert
By Oxygun


According to the geology reports there is plenty of gold in Oregon it just depends on where you look. Gold and other minerals of interest are found throughout the state, but the northeastern part of the state has produced more Gold placers. Gold mining was occurring in Oregon as early as 1859 when the first goal strike happened. Most of the rivers and streams in Oregon carry placer gold; another place where placer gold is found accompanied by about 10% platinum is in the black sands found on the beaches of the Pacific Ocean.

Panning for gold in a stream.  USFS


What you should do is try panning for gold in a likely looking stream for starters. The best kind of stream to find gold in is what might be termed a babbling brook with lots of boulders and rapids and other places where gold may be entrapped. You can usually find gold on the inside of bends on what is called the point bar. Gold is also found behind a boulder or any place where the water changes velocity from fast to slow. Generally any place where Swiftwater trout would be found is also a good place to look for gold.

Two of the best places where gold may be found in a stream is where the water runs over a ledge in the stream causing the gold to be caught in cracks on the rocks. The other place is in the plunge pool beneath a waterfall.

One of the best places to search for gold in Oregon is in the northeast quadrant of the state. This part of Oregon is mostly desert, and because of the arid conditions water is apt to be scarce for gold panning. A gold pan works almost as well in the desert as it does in more humid places where water is abundant; the difference is you don't have any water to help of the panning process otherwise the process for finding gold is practically the same.

This is what you have to do to dry pan. Fill your gold pan about half full of gravel and go through the same motions that you would if there was water in the pan. That is shaking the pan horizontally so that the larger stones and pebbles come to the top. You’ll have to pick them out by hand almost the same way that you do with water. Keep working the pan until all you have left is sand.

Now you are ready to work the sand down into a concentrate. Holding the pan so the internal riffles are facing you and slowly by rocking the pan back and forth while the excess sand pours over the edge of the pan. In this manner you can work the sand down until there isn’t really anything left but the black sand concentrate that you can take home and work over at your leisure.

This is a thunderegg collected in the Blackrock Desert.
Photo by David Rix Eibonvale


There are other minerals of interest in Oregon among them are agates and thundereggs. These stones are usually associated with flows of basaltic lava. It is in the cavities and gas bubbles in the lava that the agates and thundereggs are formed.

Most of these thundereggs are found in gravel where they have been washed out of the basalt cliffs. The thunder egg have a crust that is kind of nubbly looking. Once you see one you will always be able to recognize another. Agates and thundereggs are very hard to see in nature, but there is a way to lure them out of their hiding place. Using a spray bottle filled with water spray the gravel in front of you and if there are any agates were thundereggs there. By being soaked with water will make them stand out against the other stones like a neon sign.