Total Pageviews

Showing posts with label tools. Show all posts

Sunday, July 8, 2012

Streak Plates for Mineral Identification

Black and white streak plates showing colored streaks for pyrite and rhodocrosite on black & white streak plates

One of the most important tools in the arsenal used for mineral identification is the streak plate.  This aid to mineral identification is usually a piece of unglazed porcelain. The two colors most commonly used are black and white with white used for dark colored minerals, and black used for light colored minerals.

Black colored stones are often called touchstones for testing gold that leaves a golden colored streak that when treated with nitric acid can be used to tell the karat of the gold being tested.  If you draw a line with gold on a black piece of unglazed porcelain it leaves a golden streak that can be tested by applying different concentrations of nitric acid to the streak thereby finding its karat or quality.  24 karat gold is unaffected by the acid, but as the amount of gold in a sample decreases you are able to determine how much gold there actually is in the sample.  Different karat values have different colors.  For ages this was the definitive test for gold but it has been replaces by more accurate tests based on electronics.  In the test 24 karat gold is unaffected, but lesser grades of gold show increased chemical activity.

The black streak plate is used for testing for other precious metals belonging to the platinum group metals (PGM).  In most cases it is used to test light colored minerals.  Conversely the white colored streak plate is used for testing light colored minerals.

For our prospecting and mineral collector friends we have made available a streak testing kit composed of one each black and white 2”x 2” test plates for $10.95

Individual streak plates are available for $5.75 each.

They can be ordered online with instructions for their use included.

Full set black and white: $10.95 

Streak Plate Set (B and W)


Single black streak plate $5.75: 

Black Streak Plate


Single white streak plate $5.75: 

White Streak Plate


Connecticut residents please add 6.35% sales tax.

Shipping is included on all orders.

From time to time we will be adding other items useful for the mineral collector or prospector.

Photo by Ra'ike

Thursday, October 27, 2011

Gold found in Roads and Sidewalks

A small gold nugget that can be found in sidewalk cracks.
Photo by Rob Lavinsky


The last place you would ever expect to find gold is around roads and sidewalks, but according to our spies it turns out that these are excellent places to search for placer gold. The sidewalk or road all have cracks, and a surface that is ideal for catching gold.  There may not be much, but over time the cracks can collect quite a bit of gold particles.  Another place where gold will collect is on the side of roads or sidewalks.  It has been reported to us that at least one man makes a living from the gold he collects from sidewalk cracks in New York City.

A good place to look for gold is at the sides of roads, or cracks in the pavement/
Aron C's Photos


This doesn’t only work in New York, but can work anywhere’s there are roads and sidewalks.  Obviously it will work better in places where there are existing gold mines like in Timmins, Ontario or Washington, DC that is in the middle of the Appalachian Gold Belt.  Just think about that panning for gold in the middle of our nation’s capitol.

Gold in cracks is going to require some different tools then the average gold miner would think about, although many of them can be found in the average kitchen like a broom and dust pan.  You can’t pan for gold in the middle of the road so you’ll need a plastic bad with a zip top to hold your concentrate until you get home.  Other handy tools include a paint brush, a small carpenter’s level, a magnifying glass and some kind of metal hook to get the gold bearing sand out of the cracks.  A battery powered vacuum cleaner is a nice addition, but not necessary.

Gold lurks in the cracks found in sidewalks.
Photo by Christopher Beland


The carpenter’s level is so you can check the slopes to see which way the gold has traveled.  The broom is for sweeping the sidewalk; the brush is for getting into the cracks.  The vacuum cleaner can be used in place or the broom or brush.  The dustpan is for collecting the dirt from the road or sidewalk.  The plastic bag is to put what you have collected into before taking it home where it is finished.

The major source of this gold it from what is carried onto the sidewalk from peoples feet.  It takes several years for the accumulation of gold to build up enough to be worthwhile.  On roads the gold comes from road sand in colder places, or from gold that is carried onto the road by tires.  Most of this gold migrates to the side of the road by the action of runoff, where it is found right next to the side of the road. 

There are many other odd places where gold can be found especially if you are prospecting around old ghost towns.  Some of the best places to look is where there were former salons or bordellos.  Just remember the old saying; gold is where you find it!

Saturday, May 7, 2011

The Tools of the Trade by Raymond Kukkee, Prospector

Prospecting country in Northern Ontario this is a photo of Kakabeka Falls called the Niagara of Canada.  Ray lives in the town of  Kakabeka Falls, Ontario.
Photo by Hans Jurgen-Hubner


Raymond Kukkee has been a hard-rock prospector in Northern Ontario for over thirty years, and the following article is built on his experiences while prospecting. 

What you should take with you on a prospecting outing is always a good question. It's always better to have something and NOT need it, than to be 60 miles out on the trail wishing you did bring it along.
    
 Here's a list of what I usually take along on my day trips.  Remember I 'm going out in my truck and might be  dragging  a 4WD Quad along to save the feet too!

Even for a 2 hour walking trip, I take most of  the following tools and other helpful items,  but once out in the field  at times,  I may leave some  items  in the truck, depending on the outing:


•    A jeweler's loupe,  I use a 25x triplet
•    Topographic  and geology maps of area to be explored
•    Prospector's license*
•    Pad and pencils. Take extra pencils, they get lost easily. A compact  waterproof paper notebook is handy
•    A compass  (liquid-filled, good quality)  I use a Silva  or Brunton surveying type  c/w signaling mirror
•    A GPS unit capable of mapping,  projecting and tracking way points.    My present GPS is a Garmin GPSmap76CX, which is reliable and runs for a couple of days on 2 AA batteries.
•    Safety glasses for bashing rocks.  We only have ONE set of eyes so take care of them!
•     A compact first aid kit
•    A belt-carried hunting knife -6"   and / or a multi-tool type belt knife
•    A prospecting "pick" hammer. (In this area we have a special tool called a "Tweedie" tool named after Ron Tweedie, the inventor and maker.  It is a 36" short-handled   hammer with a 3" flat blade opposite that can be used both  for whacking rocks and grubbing, to remove moss/dirt for stripping.  (In prospecting that is convenient, it saves you bringing along a wide pick.)   At times it might be the only hammer you carry.
•    A sharp cold chisel  ½" x 12" long
•    A 4-lb short- steel- handled  "crack hammer"  unbreakable (Estwing) for serious sample removal.
•    Some paper to wrap special delicate specimens
•    Plastic sample bags 6-10  mil  8x14"  are good,  but  you can use recycled plastic bags of any type. I take along heavy recycled 1-liter plastic milk bags when available.*
•    A red or orange wax pencil for marking stakes or posts.
•    Fluorescent flagging tape to mark sample locations
•    A black marker to write ON the flagging tape
•    A short-handled ox-head axe--for cutting claim posts.   If cutting claim lines, I also  take along a
•    Swedish brush axe which is the bow design.
•    A folding shovel for the back pack, and a long-handled shovel for the truck.
•    A very compact emergency 3"x4"x 2"fishing outfit, a few hooks, line, sinkers, and a small lure.   Maybe a small collapsible fishing rod!
•    Wide-brimmed floppy hat that will cover the ears.
•    Full face mosquito net that fits over the floppy hat for extreme insect conditions.
•    Fly dope.   Various types, it must work on blackflies, mosquitoes, and deer flies.  But is generally USELESS for those tiny noseeum sandflies in hot weather
•    Extra socks to keep the feet dry.
•    Heavy boots that have high ankle protection. Waterproof boots are best
•    Rain gear--lightweight rubber but full body coverage including a hood--or the  Gortex type
•    Long-legged pants,  NOT shorts.
•    Long-sleeved shirt and jacket
•    Leather gloves, or good quality cotton gloves with leather facing
•    Eye-glasses.  I always take a spare pair!
•    Sunglasses
•    Sunscreen: 40SPF minimum.
•    A compact, folding dome tent.
•    In some areas, a snake bite kit is a good idea.
•    For SOME locations, belt-carried  Bear pepper spray is important.
•    Aspirin or Tylenol.
•    Medications if you need them.
•    Drinking WATER:  NEVER  allow yourself to become dehydrated.
•    Matches. Use safety matches, protected to keep dry, or bring along a Fire Starter (magnesium) bar.
•    Food:
•    Dry Trail mix for snacks.  
Oranges are good too, and keep well
•    Lunch!    The best part of prospecting out in the bush!  I almost always take cheese sandwiches going on day trips into remote areas.    Take food that will still be good for a week even if it's squashed, melted, or beaten up. Dehydrated type foods are good for long trips too.
•    **  NOTE:   NEVER take meat sandwiches or chicken with mayonnaise out into hot weather, they can be unsafe to eat after a few hours in summer heat!
•    Hot Coffee or Tea in a thermos for cold days.
•    A small single-burner propane stove can be handy!
 
    
I guess that’s about all you  can carry, but then there’s a spare key for the vehicle,  spare gasoline, a couple of quarts of oil, some tools, a Jack-all, a couple of spare tires, and walkie-talkies if you have them.


Don’t forget that 8-lb sledgehammer for serious work, a compact bow saw for firewood -- and your driver’s license.

I guess that’s about all you should need at this point.   I hope you’re having FUN!  If I think of anything else, I’ll let you know!     Stay safe!

Raymond  

* Needed in Canada!

Monday, January 10, 2011

The Hollon GoldMaker for Rapid Gold Recovery


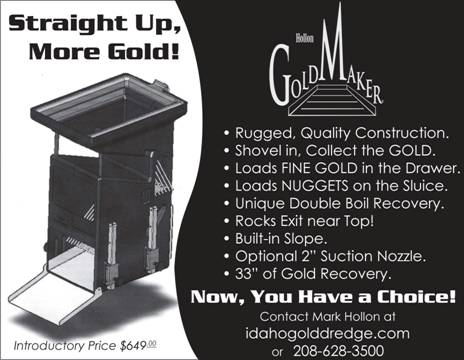
The latest entry into the tools available to small scale gold miners is the Hollon GoldMaker. The Gold- Maker is an extremely efficient and highly portable device for working in placer gold deposits. This is not a toy, nor is it a gimmick it will go is designed for producing the largest amount of gold as fast as possible for a couple of guys or gals armed with shovels. The maker says, “if you can shovel into the top, you can make gold.”

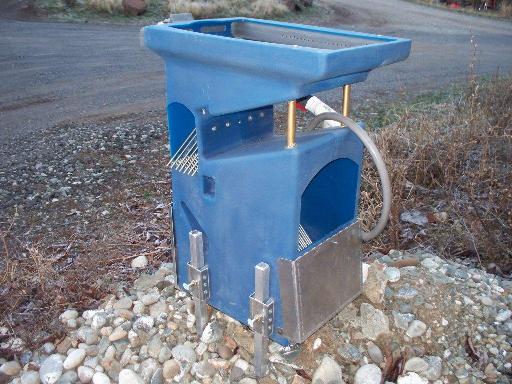
The Hollon GoldMaker setup for action.


Features:

The Gold maker only weighs 32 pounds with its legs included. It has a unique molded spray bar supplying water to the Gold maker that has a built in slope that is capable of producing more Gold. This will build device was invented, tested and built by miners that love gold mining.

The Gold maker only requires 20 gallons of water to operate, it is equipped with a scalper allowing for quick field testing for gold and other valuable minerals. At the bottom of the Gold maker there is 11 1/4 inch wide true or that easily fits into a 5 gallon plastic bucket for a quick clean-up.

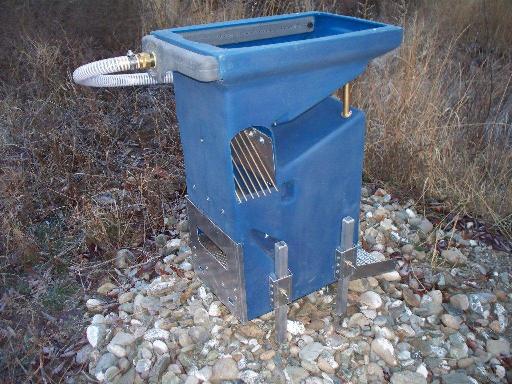
Another view of the Hollon GoldMaker 


 Accessories for the Gold Maker:

Gold maker comes equipped with a 2 inch suction nozzle including 15 feet of either one or two inch in diameter and a 2 inch suction nozzle with attachments.
There are also a set of settings and legs so that you can turn your Gold maker high bank or into the 2 inch suction dredge high bank or combo.

The Hollon GoldMaker in use being loaded with stream gravel.


How what works:

All you have to do to use the Hollon Gold maker is to show will some gold bearing gravel into the top where it is washed by water from the spray bar. If there is any material larger than three quarters of an inch is classified and exited by the top classifier, but is sometimes called a grizzly. By exiting the discarded material near the top of the Gold banker close your discard pile to grow without trying to crawl back into the machine immediately or fouling the lower sluice box.

In the next step the smaller material passes through 8 second 3/16 inch minus classifier to enter the recovery drawer. This recovery drawer has several features that were designed especially for trapping the finest gold that includes two boil recovery areas having unique scallops that were designed to put the finest gold further up the hill, and at the back of the boil. This design means it is less likely to migrate down through the riffle system to eventually run out of the bottom of the machine.

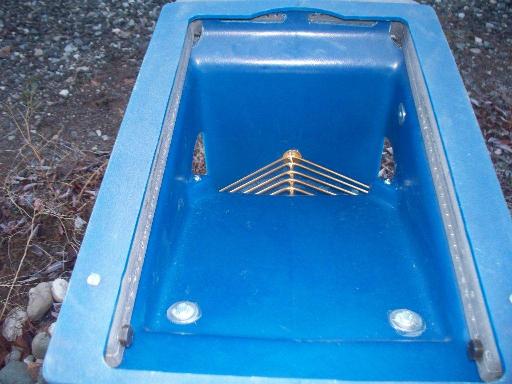
The Top of the GoldMaker showing the grizzly for removing large stones.


The Gold banker also features a scalper area which can be quickly cleaned and panned to test a theory that you are mining in an area that is Really productive. After two or three hours of operation, all you have to do is simply remove the drawer and recover your Gold.

If you are worried about the material that measures between 3/4 inch and 3/16 inch that may contain potential gold nuggets. In the GoldMaker this material slides down to the second classifier where it is reloaded into the sluice box below the find recovery drawer allowing the nuggets to be recovered without them or the other medium material mixing with and fouling the fine gold recovery.

The two inch suction dredge used in conjunction with the GoldMaker.


Throughout the entire 34 inch gold recovery system the whole thing is laced with an expanded style of riffles and trips designed to catch gold. Riffles used in virtually all the other gold recovery systems are not able to catch the finest gold alone because the action of water and materials of the sluice box as well as vibrations caused from shoveling along with the rocks rattling around in the system as they move down and out will eventually allow many small gold flakes to slowly migrate out one step at a time. The unique system of boil recovery that is used in the Gold Maker is one of its most important features. Until you have used the Gold maker system that catches even the finest gold particles in quantity, you will does not know what you have been missing!

Disclaimer: 

This is not a paid advertisement!